|
FISH KEEPING PART 2
SETTING UP A
COMMUNITY TANK: an application of the previous data on
Page 1.
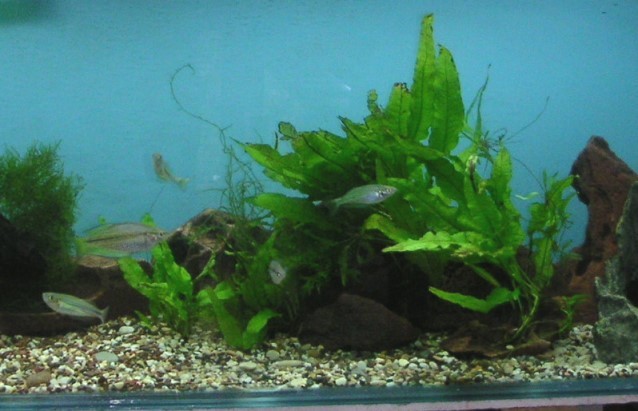
A community tank is one that keeps mainly fish
and has a few plants and rocks and other decorations. The fish
and plants may come from anywhere on Earth in a community
tank- provided that they are compatible species. A Community tank is
distinct from a biotype aquarium in which a specific environment is
mimicked and is stocked with species particular to that biotype
alone (e.g. an Amazon biotype or a Lake Malawi biotype). Other
specific, tank
populations may comprise Livebearers Only, an Australian
Rainbowfish collection (or single species) or be for a breeding
colony of fish.
The first principles are the same for any tank
design. PLAN AHEAD & PREPARE for the type of aquarium
that suits the type of fish or fishes that you wish to keep.
Ok, you have selected a suitable tank, washed it in clean water
(no soap or detergent used) and have placed it in position on its
polystyrene cushioning pad. Now it can be fitted with filters
and air-pumps and other equipment BEFORE the water is added.
DECIDE
ON THE TYPE OF FILTRATION TO BE USED
You cannot have too much filtration!
Begin with the best system that you can afford. There are
three main filtering functions:
- particle filtration (also known as mechanical
filtration) that removes large particles and suspended
matter from the water. Particle filtration improves
the appearance of the tank but does not remove or control
the dissolved substances that result from the natural
metabolism of the fish. With particle filtration
alone, dissolved, toxic wastes build up in the tank and will
harm the fish.
- biological filtration that uses naturally
occurring bacteria to breakdown toxic, biological, waste
products of the fish, including faeces, urine, ammonia (or
ammonium in low pH
water) and nitrites. This uses a natural cycle- the Nitrogen
Cycle- to convert harmful ammonia and nitrites to less
harmful nitrates. This is the most critical filtration type
for the health of your fish.
- chemical filtration that uses adsorption and
absorption to remove harmful chemicals from the
water. Activated carbon filter mediums and zeolite mediums
are examples of chemical filtration. Chemical filtration is
used to remove heavy metals and toxic wastes substances,
including ammonia/ammonium (NH3/NH4),
nitrite (NO2), nitrates (NO3) and
phosphates.
All of these filtration functions are essential for good
water quality. Most good filters combine all of these
filtration functions in one unit.
All filtration processes must be supported by regular
maintenance and partial water changes. As a general rule,
aquarium water should be changed at the rate of 20% to 25% of
the tank volume each fortnight. Never change ALL of the water
at one time- unless you wish to recommence ageing the aquarium
water! It is good practice to carry out any cleaning of
filters when changing the water. Wash any dirty filter medium
in the same water that you have syphoned out of the tank.
Dechloraminate the fresh water before adding it to your tank,
of course.
TYPES OF FILTERS
Under gravel filters work well for beginners. They are
simple to set up and run efficiently as combined particle and
biological filters. U/G filters consist of special, perforated or
slotted plates that sit on the bottom of the tank, directly on the
glass. The plates are covered with a 2-3 cm layer of coarse gravel
which acts as the filter medium. Connected to the plate is a riser
tube that passes through the gravel and enables the water to be
drawn upwards, creating a flow through the gravel, the plate and up
the tube into the tank. The flow is driven by either of two methods;
a) an air flow provided by bubbles from a small, plastic tube and an
external air pump; b) an electrically driven, internally fitted pump
with impellors that sits on top of the riser tube and draws water
through the system. These filters work well, removing particles by
trapping them in the sand where they decompose and are cycled by
bacteria. New U/G filters take at least a month to become
functioning, "cycled" biological filters. As the matured, U/G filter
functions, the water chemistry changes as nitrates build up in the
water. Over longer periods the water also tends to acidify. The
gravel-bed also clogs up and can compact through long use. Cleaning
the gravel bed and changing the water regularly is essential to keep
the filter bed open and operating efficiently and to remove
concentrations of nitrates. One disadvantage of U/G filters is that
plants cannot be grown in the gravel beds- most plants roots are
affected by the constant water flow. This problem can be overcome to
some extent by having the bottom of the tank compartmentalised- one
section for the filter and another for the plants- or by growing
plants such as Java Fern (Microsorum pteropus), Dwarf Anubias
(Anubias barteri nana), that do not require a root run in the
gravel.
Internal filters, such as
box filters (air-lift types or impellor-driven models) and
sponge filters are also effective but they require more regular
cleaning than U/G filters and can be noisy. Most require sponges
and/or filter wool to function and allow for layering of filter
media to provide different functions. The water passes through a
particle removing stage first (through filter wool, Dacron pads of
fine sponges) and a more open, biological filter stage provided by
media such as coarse gravel, zeolite, sponges, ceramic tubes or
bio-ball. Do not use fibre glass filter wool, as the fibres break
and can enter the water and affect the gills of the fish. Activated
charcoal or special filter media can be used as a second stage in
box filters and need to be contained within the system by using
fine-mesh bags. Dacron and nylon filter media are available and
sheets can be cut to size to suit any filter. Internal filters need
to be cleaned regularly and charcoal needs regular replacement.
External canister filters
serve very well for larger tanks and also require regular
maintenance. They allow for a variety of filter media to be used, in
layered stages, including filter wool, sponges, charcoal, ceramic
tubes, plastic bio-balls and zeolite. With proper installation, as a
second-stage filter after the water has passed through a sponge
layer to remove course particles, ceramic tubes and bio-balls are
self-cleaning and provide very effective biological filtration.
Charcoal and zeolite need replacing regularly and filter wool and
sponges need to be washed frequently. External filters make this job
easier than with internal filters- but it is still a necessary,
messy business. If tt is done at the same time as a regular water
change, the water removed from the tank can used to wash the filter
media so that beneficial, bacteria cultures are not completely
removed. Never wash filter media in tap water unless it has
been dechloraminated first.
Marineland's Bio-Wheel filters
are excellent, combining particle, chemical and biological
filtration in one external unit that hangs on the side of the
tank. An electrically driven impellor draws water through a riser
tube (J-tube) into the filter chamber where it passes through a
fitted, filter pad that acts as a particle filter and as a chemical
filter (it contains activated charcoal). At the out-flow point there
is a padded bio-wheel that rotates in the emerging stream (like an
old water-wheel in a waterfall), wetting its fins with water. The
fins on the bio-wheel provide a surface on which denitrifying
bacteria grow and provide an oxygen rich medium for biological
filtration. Once "cycled", the filter and the wheel make an
excellent filter system. The filter pads can be changed when
required (or washed and re-used) and the bio-wheel requires no
maintenance other than to see that it rotates freely on its bushes.
The only disadvantage is that the returning water falls into the
tank and can splash, be noisy or displace plants in the flow.
Keeping the water level in the tank high, avoids those problems to
some degree.
Choose the best filter that you can afford. Consult your
local aquarium shop for advice on the range of types of filter
available (it is huge- so do your research first) and check to see
that your choice of type and size is adequate for the size tank,
fish type and numbers that you keep. Aim for maintaining aquarium
water with no nitrites or ammonia, as provided in a very efficient
biological filtering system.
Frequent, partial water changes are also essential as part of the
water management routine, with fortnightly changes of 20% being minimal to remove the
nitrates produced by the biological filter.
A well functioning filtration system will take two to six
months to mature the biological filtration component, depending on
size and water flow rate and type of filter medium used.
AIR PUMPS
AND AERATION
Air pumps may be necessary for driving some air-lift
filters and/or act as an aerator by providing bubbles of air to the
water. What you need is a small air pump for aquarium use, a length
of plastic tubing and fittings and an air-stone to provide the
bubbles. The principle is simple: the fine bubbles produced by an
air-stone effectively increase the surface area of the tank and
enable gaseous exchange to take place between the water and the
atmosphere, at a rate greater than allowed by the tank's water
surface alone. In that way, a constant carbon dioxide level (at
atmospheric levels) is available for plants and adequate oxygen is
provided for the fish. Water movement and the small currents
produced keep the water mixed, avoiding temperature layering as
well. Any detritus is also circulated and made available for intake
into filters. For that reason, air-stones are placed near
intake tubes for filters (unless they are part of the filter) so
that detritus is removed.
You will need: an air pump, lengths of plastic
tubing, an air-stone, gang valves or clamps and a check valve.
Why Aerate?
Since water temperature limits the amount of
dissolved oxygen in the water, varying inversely with temperature,
fish kept in water at or above 25oC are benefited by
additional aeration. Oxygen dissolves in the water from two sources
(mainly), from gaseous exchange at the surface and from release into
the water from photosynthesising plants. Thus, in a well planted,
adequately illuminated aquarium, oxygen is made available to
fish from the plants. It is the reverse at night, as plants take up
oxygen and deprive the fish. Hence aeration is required at
night to allow gaseous exchange to keep oxygen levels at appropriate
levels. Aeration during the day keeps carbon dioxide at levels
suitable for the plants and provides water movement.
Select a pump large enough for your needs and an
air-stone that provides fine bubbles. Allow 1 litre of air
through the system per hour for every litre of air in the tank.
For a 55 litre tank, a pump that delivers at least a flow rate of 55
litres of air per hour. The range of pumps and air-stones available
is huge so ask for advice. Position the air-stone near the
intake pipe for the filter. Don't run it like a boiling pot
but aim for a gentle flow. Control is usually given by gang
valves or clamps in the air line.
CARE must be taken with placement of the pump
outside the tank so that water does not siphon out of the tank in
the event of a back-flow caused by a power cut. Check valves
reduce the risk by preventing back flow. If possible have the
pump located above water level. Also ensure that electrical cables
are safely away from the water.
ADDING
SUBSTRATE, ROCKS and WOOD. Be environmentally conscious and do
not plunder the landscape to obtain your sand, rocks and wood!
If an external filter is used, the gravel layers must be thin (no
more than 30 - 50 mm) and regularly cleaned when siphoning out
accumulated wastes. The sand or gravel depth will need to be
at least 20 mm in the front of the tank, grading to 50 mm at the
back (with the slope providing a fall of the detritus to the front
for easier cleaning later on). The darker the material, the better,
as it reflects less light into the fish's eyes as they forage.
Most commercially available material in S. A. is too light in colour
and needs to be shaded by plants and rocks. Shops usually sell what
they can get, not what you need, and that is dictated by
availability and commercial practices. Do not use limestone,
marl or dolomite gravels or sands. Choose quarried, alluvial quartz
(this has rounded grains), river or creek sands and gravels that are
not sharp or heavily mineralised with iron or calcium. Again,
consult your local supplier, who may stock a number of different
substrate materials or obtain them for you on request. Wash the sand
very thoroughly to remove any dust, silt, clay or humus particles
that you have purchased as waste along with the substrate material.
Using an under gravel filter will decide the grain size used.
Fine, pea gravel is best for an under gravel filter, layered to a
thickness of 50 to 80 mm. Place the filtration grid on the
bare, glass bottom of the tank and add the pre-washed gravel on top.
If cichlids are to be kept (or any species that digs) cover the
first 40 cm layer of the sand with a fine mesh (sold as 'gravel bed
keepers') and place the rest of the gravel over it.
ROCKS (if used) also need to be smooth edged and of
inert chemical composition. Non-calcareous rocks are usually
used (no limestone, dolomite or marl) in soft water, low pH
environments. Sth Australia offers a nice range of local
granite, basalt, slate, quartzite and sandstone that are
suitable. Creek bed rocks may be suitable but please do not rob the
environment to furnish your tanks- consult a landowner for
permission to gather rocks. Make sure the rocks have no sharp
edges and wash them thoroughly. Arrange the rocks so as they will
not fall or move or create traps for the fish. Rocks are not
essential to a tank, but are used for decor and to provide hiding
places and territory markers for the fish in community tanks.
Limestone, dolomite and marble can be used in rock pile biotypes with Rift Valley
cichlids such as mbuna where it is beneficial as calcareous rocks offer a
buffering action that helps maintain pH around 8.2 - 8.5
(hard water, high pH environments) Aragonite is a superior
buffer, however, and is found in coral gravel and sand and crushed
oyster shells and is used in marine aquaria.
Always be mindful of potential falls when creating a rock pile
biotype or any structures in the tank. Do not place rocks near
unprotected glass heaters in case a fall cracks the glass. Place
large, heavy rocks directly o to the bottom of the tank and not on
the substrate, to avoid falls and shifting substrate. Stack
rocks carefully, so as they cannot move or fall. Cementing
structures with silicone sealer is recommended when building hides
and caves, for safety reasons. many fish species dig so ensure that
rocks are immoveable.
Go here for a detailed
report on rock types for aquaria (link to an internal site).
WOOD can be used as decor for aquariums. Well seasoned
mangrove roots, oak
and beech logs and branches are good choices, however, S. A. offers little
material that is suitable. River Red Gum (Eucalyptus
camaldulensis) wood, that has been long dead and well aged
(seasoned), soaked and boiled, is suitable. Imported peat
"logs" and mangrove roots are available commercially and need to be
well washed before using them. Using wood may stain the water with
tannins and other dyes and also add to the
acidity of the water (as in the Amazon itself!). Any strong discolouration may be removed by
using an activated carbon-filter but this is not essential, as most
fish thrive in such "black" waters. Moulded plastic
replications of aquatic landscapes are available from some aquarium
shops and give a wood-like appearance, with low environmental
impact.
Always treat any wood before using it, so that any tannins are
removed from the timber. Soak the wood in a large tub of water
until it no longer discolours the water-this will take weeks!
Repeated soaking and boiling may make this job quicker, if
practical, changing the water between successive soaking, boiling
and cooling, until the water is not tainted.
Using painted stones or gravel, coral, shells or metal ornaments
is risking trouble. Coral and shells trap food particles and pollute
easily. Processed items may contain heavy metals in the paint
or ceramic fabric that may contaminate. Safe, moulded plastic
aquarium decor is available from some aquarium shops- but check to
see if it is labelled "safe". I prefer a "natural looking" tank
environment and I do not use ornaments. It is a not merely a
matter of taste, as we can never be sure what paints and dyes have
been used in colouring gravel, mouldings and coral.
ADDING WATER
Add the water slowly, so as not to
dislodge the equipment, substrate, wood or rocks. It helps if a soup
bowl or saucer is inverted and placed on top of the substrate onto
which to gentle pour the water. Fill three-quarter way only at this
stage, as it makes planting plants easier.
GETTING THE WATER RIGHT
IS ESSENTIAL BUT NOT DIFFICULT TO ACHIEVE
The best advice is to buy the biggest tank that you can afford (but
no smaller than a 55 litre capacity) and at least 35cms deep. Fill
with clean freshwater that has a pH
between 7.0 and 7.5 (see below). I use dechloraminated tap water for
general keeping, even in South Australia where water is notoriously
hard.
Understanding Water Chemistry
(this links to an external site):
read this background material for an introduction to water
chemistry.
Most South Australian tap water is hard and has a high
pH and high conductivity because of its dissolved mineral
content. Our River Murray water in S. A. is especially heavily laden
with salts and pollutants. Most people will need to treat their tap
water to make it suitable for fish that need soft water (such as
Discus, Cardinal Tetras and Bolivian Butterfly Cichlids).
Fish require water that is pollutant free. This can be achieved by
using dechloraminated tap water adjusted with additives that remove
chlorine and/or chloramines. Chlorine or chloramine is added to the
tap water by the Water Aurthorities to disinfect it for your
health's sake but both chlorine and chloramine are poisonous to fish
so must be removed from the water before using it in
aquaria. Fortunately there are chemical preparations available that
do this job instantly.
Dechloraminated Tap Water is made by
treating tap water with Wardley's "Tri-Start" or Biotec's
"Water Ager Cn" or similar products, to remove the chlorine and
chloramines. Letting the water stand before using will remove free
chlorine only. A serious aquarist will prepare a large volume of tap
water by treating it to remove chlorine and chloramines and
adjusting the pH and hardness to the correct levels before
introducing it to an aquarium. Filtration through activated carbon
will remove most other contaminants in tap water.
Preparing water for use is advisable prior to using it for set up
and later for water changes. Beginners should set up their tank and
add the necessary dechloraminating mixtures before adding any
fish. Remember to always dechloraminate any water before it is added
to the tank at any time other than at the initial set up stage.
Adjusting pH is done quickly, by using chemical additives.
Sodium bicarbonate (baking soda or bicarbonate of soda NOT
baking powder) is used to adjust the pH upwards (above
7.0). Sodium bicarbonate does not act as a buffer to prevent further
pH drop occurring as the water ages, however. Tap water
may contain a buffering agent that helps avoid pH drop,
otherwise buy a suitable alkaline buffer from your stockist and use
that if the pH drops frequently.
Reducing pH is not an easy matter, as water with a high
pH is usually hard, high in alkalinity and well buffered (like
SA's tap water). Lowering the pH requires adjusting the
hardness and alkalinity levels first. Mixing water that has been
softened by running it through a water softener could result in
water with a desired pH. Running peat in the filter
will also lower pH (and colour the water like tea) and mixing
pollutant -free rain water with hard tap water may reduce pH.
Adding phosphoric acid (food grade) also lowers the pH. Add
these chemicals in very small amounts over a period of several days
and test the water frequently until the desired pH is
reached.
Commercial products such as pH UP and pH Down are
available from stockists. Purchase one that has a buffering
characteristic, if your water supply is soft, to avoid rapid changes
in pH. Using a good acid buffer is recommended for Amazon
biotypes in areas where soft water does not come from the tap.
Consult your stockist.
NOW FOR THE
NEXT PART- plants, lights and stock
RETURN
TO TOP
Return to
Previous Page
INDEX |